
 This is one of the first Halloween posts for Fifty Shades of Fabulous, written by the one and only Scarlett. So this is the month of Halloween, or Samhain in my case. Being a Wiccan, Samhain is basically my new year and it’s my second favourite time of year, after Christmas. So as you can see, the month of October for me is all about preparing for that final day where every sense of normality goes out of the window. In some peoples case, and to quote Meangirls “Halloween is the one night a year when girls can dress like a total slut and no other girls can say anything about it”. In MY case, Halloween is about showing off skill with face paint and liquid Latex. Every year, my family throw a huge Halloween party, so being in the Wakefield family, i have to make some sort of effort right? So this is my second Halloween face paint trial (I forgot to document the first). This year, the face painting is actually going to be used for something too! With my art project being the ‘Transformation Project’ and my theme being ‘Personal Transformation’ i don’t think anything else would go better in my art than this!
So this being my first Halloween post, i thought i’d give you all a little Tutorial on how to achieve a look like this, feel free to adapt it in your own way, i just threw a load of different techniques in to show you all what you can do with a bit of toilet paper and paint.
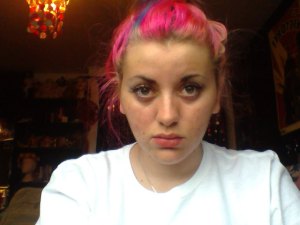
So i started with a completely clear face and my hair tied back – i apologise for my face and bad roots! I advise not to wear a white tee, i made this mistake and now my ‘Big Bang Theory’ shirt has fake blood all the way down it… I’d advise an old shirt, or even put a bin bag poncho over you!
The basic colours that you’ll need for the look are: Red, Black, Purple, Green, White, Yellow and Blue. I used ‘Snazaroo’ and ‘Boland Aqua Face Paint’ and ‘White Cream Make up’. Another few things that i used are: ‘Avon SuperShock gel eye liner, to get the dark circles around my eyes and ‘Rimmel Lasting Finish By Kate Lipstick, in the colour Rossetto 107, for the inside of wounds.
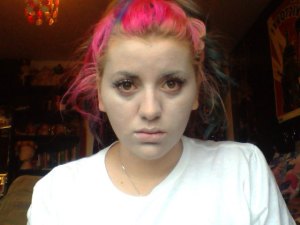
To start off, paint your whole face white with the Cream make up, or just basic white face paint if that’s all you have. This gave me an even base. I then used baby powder to get rid of any imperfections in my skin, and to me, it felt like the toilet paper stuck on better with this step.
Go over your eyebrows with the white as much as possible to blank them out, my eyebrows are quite dark, so this step was hard for me. I put on two coats of the Cream make up, but you can apply as many as you feel is appropriate.
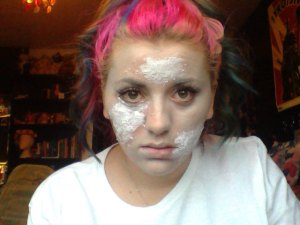
I then took sheets of toilet paper and ripped them up into fairly small segments. For this step, you can either use liquid Latex or PVA glue, i used PVA because i couldn’t find any liquid Latex! It works just as good though, and gives the same effect (It’s just a little harder to blend into your face). I chose to put the layers of toilet paper under my eye, at the side of my mouth and in the centre of my forehead – this makes a ripped eye and face, a ripped mouth and a bullet hole in the middle of my head.
Wait for the glue/Latex to partially dry, i just worked in a triangle – by the time i’d done both the side of my mouth and my forehead my cheek was just at the right dryness and so on.

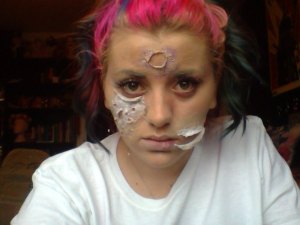
When the glue was at the right dryness, i used the end of a bobby pin to peel the toilet paper away from my eye and curl it under partially, i made little holes in my fake cheek, made a slit in the fake skin at the side of my mouth and made a hole in the middle of my forehead. Personally, i think that the bullet hole is a little big, but by the time i realised it had already dried so i couldn’t change it.
If you rip anywhere in your fake skin, just use a little bit of PVA or Liquid Latex to rectify the problem.
Here, as you might be able to tell, i used foundation to blend the edges of the toilet paper into my face. It’s best to use a liquid foundation rather than a putty or anything dry. This is because it’ll make the toilet paper dry and the ends and more likely to peel away at the edges.
Be sure to go over your whole face, especially because of the white. This way, you wont just have a tan line around the toilet paper sections.

To make the bullet hole look bruised and bloody: I used my Rimmel Lipstick to colour the inside of the hole, along with purple face paint around the inside edge to give it more depth. Don’t be afraid to mix the red, purple and black face paints to make different shades of each colour. I then used the purple face paint to dab around the outside of the wound, then used my finger to smudge it in, then i did the same with blue face paint, red, yellow and grey.
Try to make it look as bruised as possible, so really mix and blend the colours well. I will add the fake blood at the end, so it doesn’t get messy.
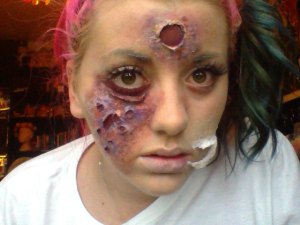
I then moved on to the cheek and eye. I started by using my Rimmel Lipstick again to line the bottom of my eye, all the way down to where the toilet paper starts to give it the ellusion that the outer layer of skin has been pulled away from my lower layers of skin. I then used a dark purple to line the crease between the toilet paper and skin.
I dabbed all of the different colours on the rest of my cheek, making sure to cover all white areas. Then i used my lipstick again to go colour the inside of each hole on my cheek, i used a little bit of lighter red face paint too, to give it more depth and texture. Then i lined the holes with a dark purple again. Be careful not to pull the flappy fake skin too far or it will just fall off.

Okay, so i accidentally missed out a photo for a few steps here.
First of all, i coloured the whole of the inside of the fake rip white, to portray teeth, then i drew a teeth effect with a thin paintbrush and black face paint. I then did the same bruising effect as i have been doing around the outside of the mouth.
I then, as you can see, have used my fake blood around the edge of the mouth, and coming down from my bullet hole. You’re better off using a thin blood for the bullet hole, but a thicker one for the mouth so it doesn’t drip down as much. I also used the black face paint to shape my eyebrows.
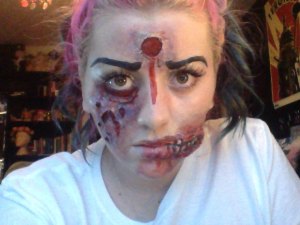
I then used the fake blood under my eye up to the fake skin and in the holes in my cheek. The blood that i got seemed to go dry after a few minutes so i advise to get a long lasting one.
I then out a bit of blood on my chin and if i were in a proper Halloween costume i’d poor some of the blood down on my costume too.
As you can see, the pictures quality is starting to get worse here, but that’s just because the sun started to go down!

Here, i’ve added a black eye shadow under and around my eye, this just adds some depth to my face. Next, to give my fake teeth a more realistic effect, i rounded the edges of the teeth, just by using some white face paint. I then added a little bit of yellow to the bottom of the teeth to add a more gross effect – because as we all know, Halloween isn’t great for out teeth now is it.
I then added a bit of black on my lips to make the lips look more fitting to the make up.

I then added a bit of black eye shadow around the edge of my face, under my chin and down the edge of my nose to give my face a slimmer look. I also added a little bit of black shimmer on my lips to give them a fuller look.
At this point, you could either add contacts, or just edit your photos to look as if you have different coloured eyes.
This look would look great with any costume, and to give more of a zombiefied look, you could add a little bit of green to your complexion.
To get the look off, i just peeled off the toilet paper, it doesn’t hurt that much, and then used make up wipes to get off the rest of the paint.
One thing i would say about this though: It’s hard to eat or laugh with fake mouth on, so maybe make the mouth a little looser.
I hope you’ve enjoyed this little tutorial on this look, if you want any more, just like and comment! – Any requests on anything for me to try, don’t hesitate to let me know!
Until the next time,
Stay safe, Stay Warm, Stay Hydrated and Stay Fabulous! – also, stay scary!
-Post From ‘Scarlett’s Sanity’ – Written by Scarlett

Actually really scary! ahahah also I nominated you for the Liebster Award tag, would love if you could answer my questions and continue the tag? Here’s my post http://highstreetspy.wordpress.com/2013/10/12/the-liebster-award-tag-2/ ❤ xxx
This look is so awesome!! Great job. http://www.kateflowermaquillage.wordpress.com
Scarlett isn’t online at the moment, but I’m sure she will be saying a great big thank you to this! 🙂
She’s so talented with the special effects makeup! She did my face like this and then made me walk home! Very amusing.
Love your blog too! Especially your lastest post “What’s In My Travel Makeup Bag 2014” 🙂
– Laura x
Scarlett is very talented with special effects makeup. She did my face like this too, and then made me walk home like it. The woman in the shop I went in to to jokingly ask for plasters actually didn’t know what to with herself. Awh thank you so much for our Nomination! That’s really kind of you! Love your blog by the way 🙂
Laura x